Are you constantly misplacing those files you download on your iPhone, leaving you in a digital scavenger hunt? Its time to streamline your file management because, with a few simple steps, finding your downloads on your iPhone is a breeze.
Navigating the digital landscape of an iPhone can sometimes feel like charting unknown waters. The operating system, with its sleek design and intuitive interface, often hides the intricacies of file management behind a veil of user-friendliness. But fear not, because the solution to locating your downloaded files lies within the device itself, specifically in the form of the Files app.
The Files app acts as a central hub for all your downloaded content, a digital repository where documents, media, and other files reside. Whether youve downloaded a PDF from a website, a song from a music streaming service, or a document from an email, the Files app is typically the place to find them. However, understanding the nuances of file storage on your iPhone is crucial to mastering this process. By default, downloaded files often land in the "Downloads" folder within the Files app. But what happens if you've inadvertently changed the default location? Or perhaps you're simply unsure of where to begin your search? This guide provides a comprehensive roadmap to help you locate and manage your downloaded files.
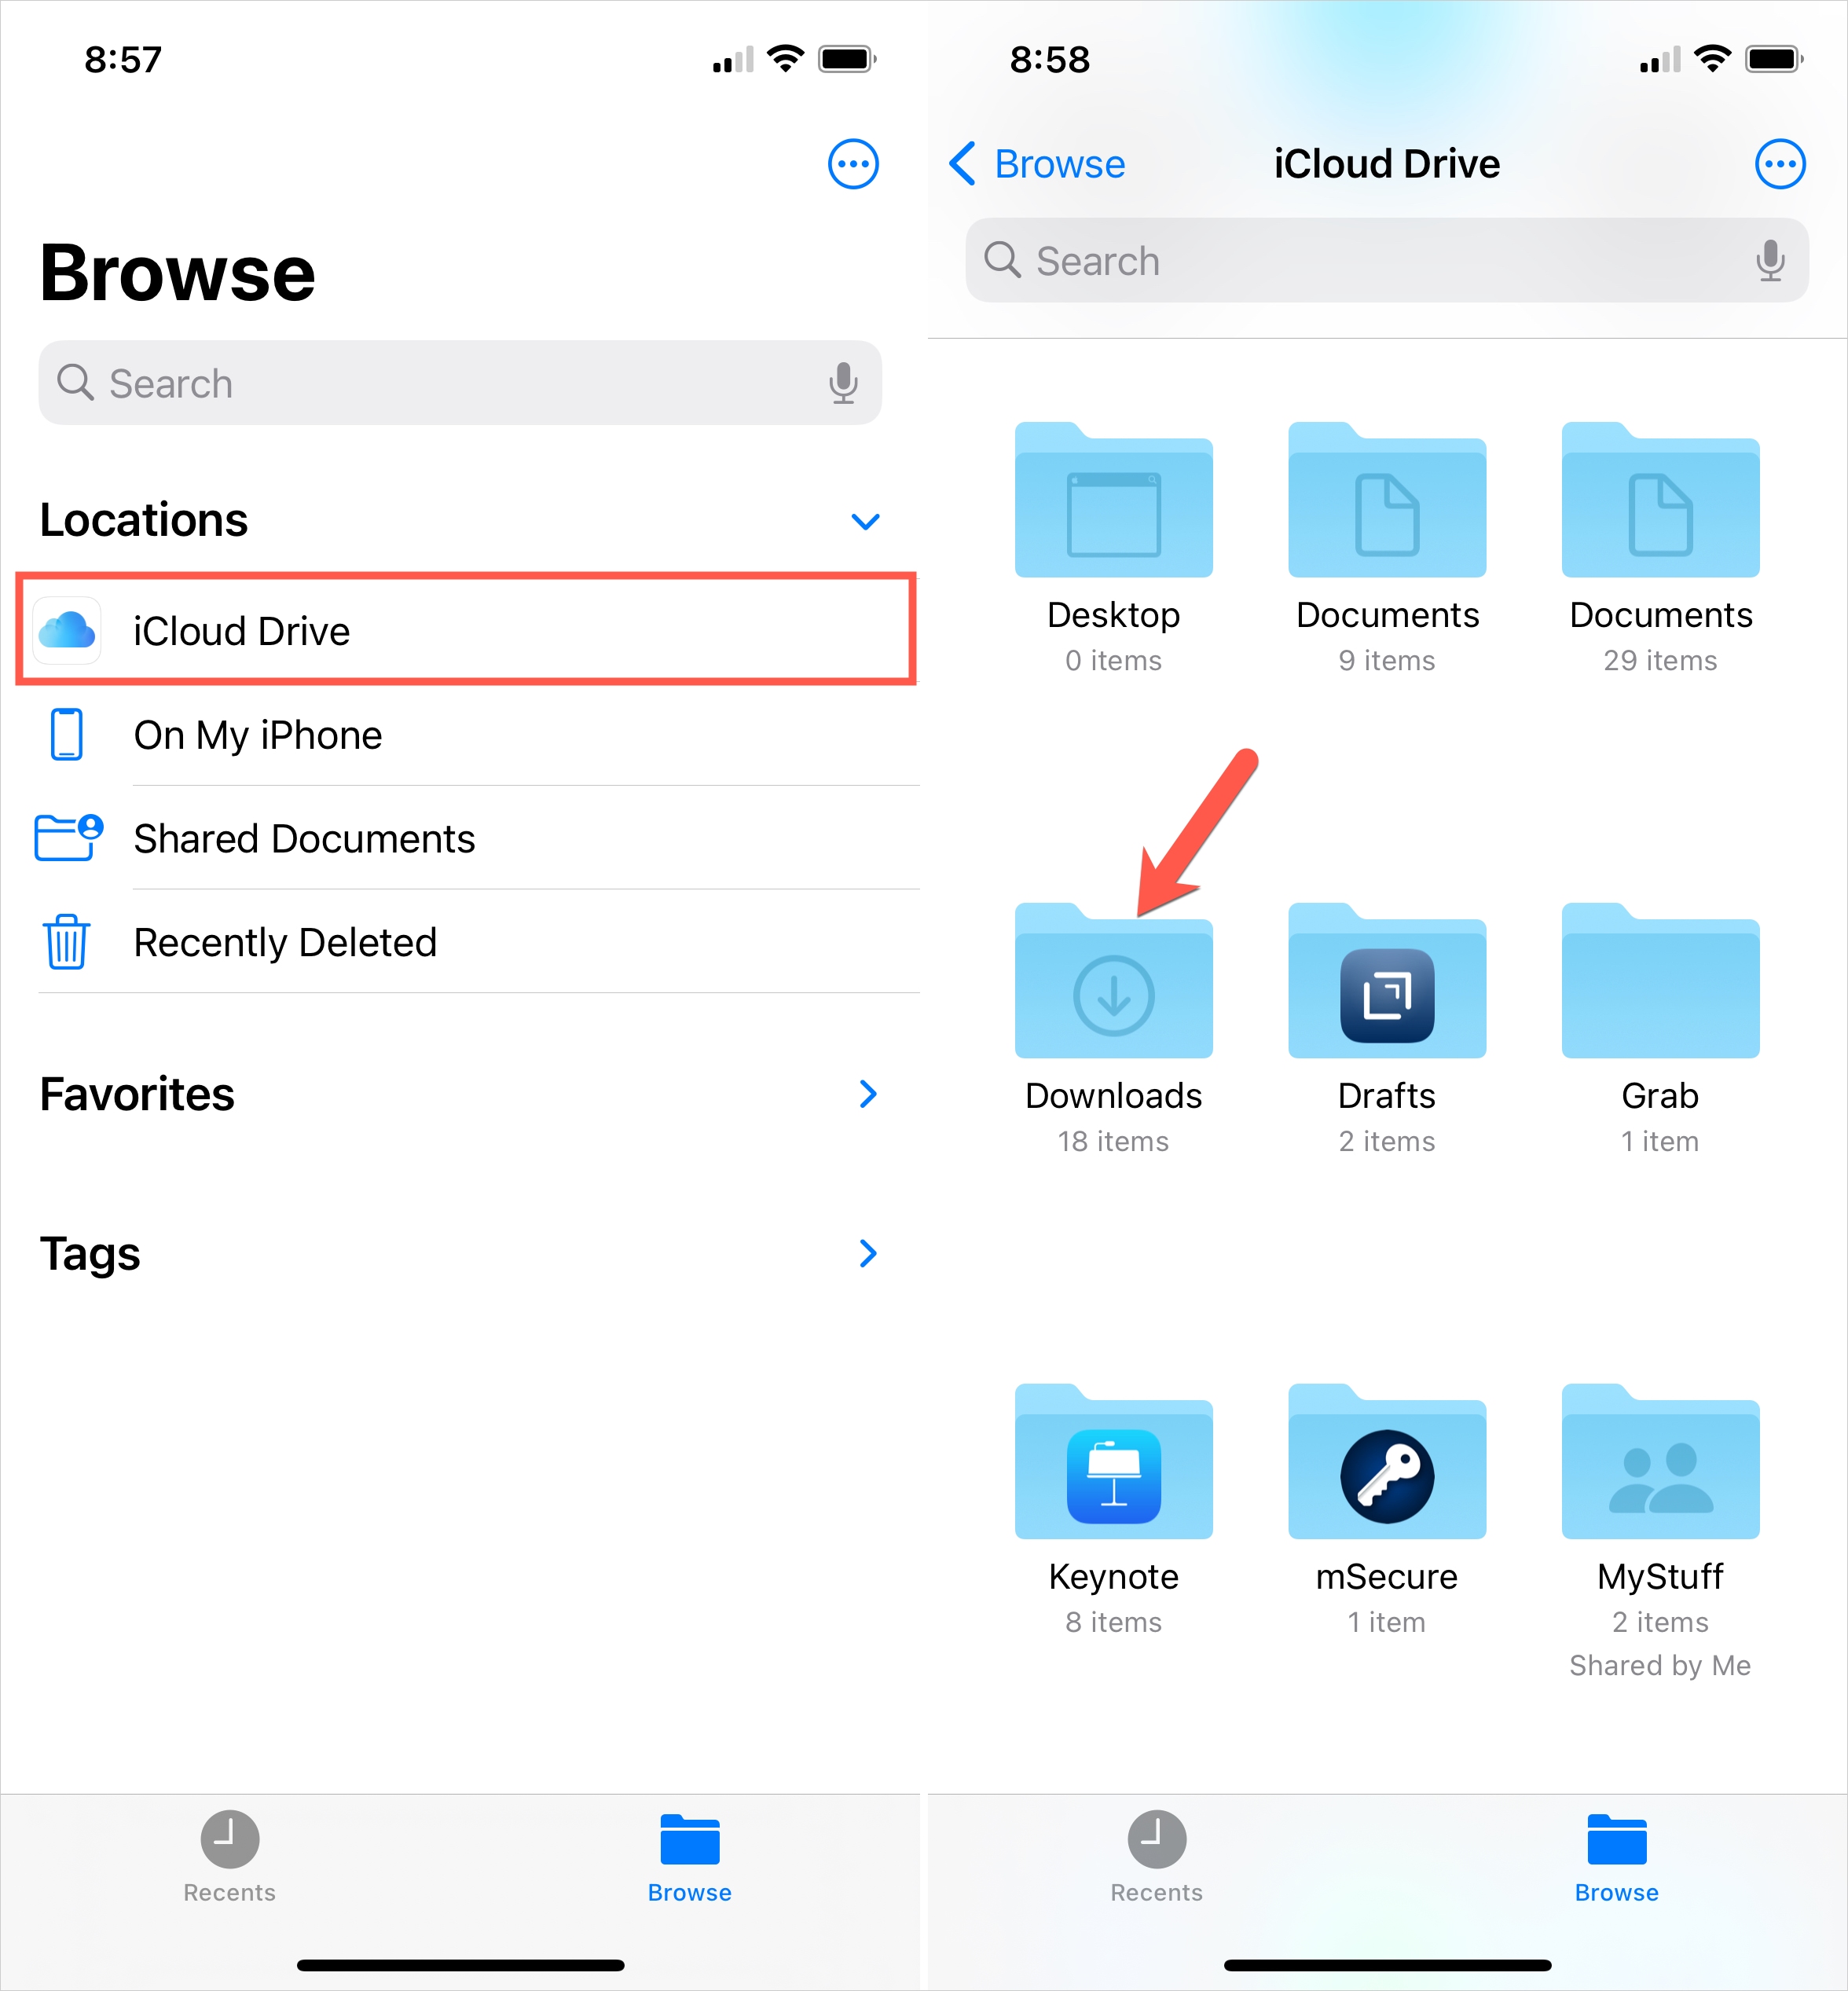
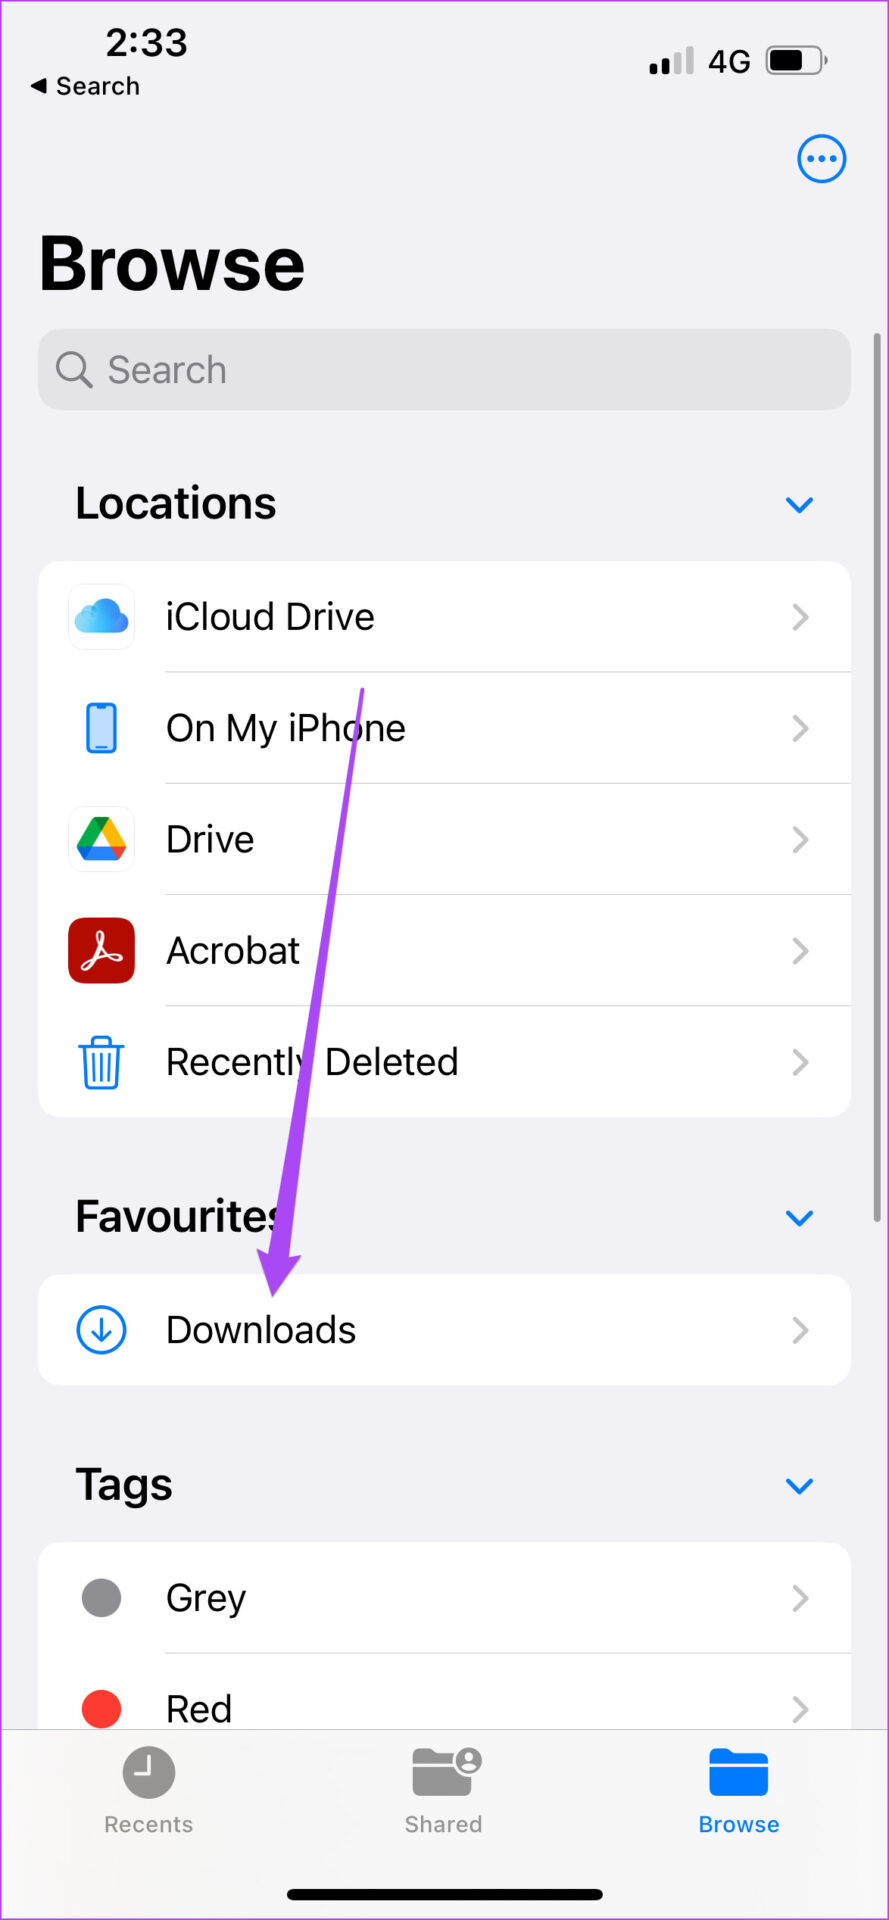
Let's delve into the mechanics. The primary method for accessing your downloads is by using the Files app itself. If the Files app's blue icon isn't immediately visible on your home screen, a quick swipe down from the center of your screen will activate the search function. Type "Files," and the app should appear. Once you have opened the Files app, you'll find a "Browse" option, usually located at the bottom of the screen. Tapping this reveals various storage locations, including "iCloud Drive" and "On My iPhone." Within these locations, you'll likely find a "Downloads" folder. Tapping this folder will reveal a list of all the files you've downloaded.
For those who prefer a more direct approach, you can create a shortcut to your Downloads folder. Within the Files app, long-press the "Downloads" folder and select "Favorite" to add a shortcut. This shortcut will then appear prominently whenever you open the Files app, providing immediate access to your downloads. Its a simple yet effective way to streamline your workflow and save valuable time.
The versatility of the Files app extends beyond mere file retrieval. It is also a powerful tool for managing your downloads. Whether it's a photo, document, or song, the Files app creates a separate downloads folder for each file. You can organize your downloads by creating specific folders for different types of files, keeping your downloads folder uncluttered. Additionally, it's good practice to periodically review and remove files you no longer need. By deleting unnecessary files, you can free up storage space on your iPhone and maintain a tidy digital environment.
The location of downloaded files on your iPhone primarily depends on the app you used to save them, and what you have set as a default location. Many apps, when you tap the "save to files" option on a file, will prompt you to choose a saving location. Depending on your settings, you'll have the option to save to "On My iPhone", "iCloud Drive", and possibly other cloud drives. As a tip, using iCloud Drive ensures your downloads are accessible across all your Apple devices, providing seamless access to your files on your iPhone, iPad, and Mac. Ensure that your iCloud Drive is synced so your downloads are accessible across all your Apple devices.
Removing a downloaded file is equally straightforward. Within the Files app, navigate to the Downloads folder. Then, select the downloaded files you want to remove from your device. Tap the "More" button, represented by three dots, then tap "Remove Download." Alternatively, to remove a single file download, touch and hold the file, then tap "Remove Download." Its that simple.
It is also crucial to understand how to remove the downloaded files from safari. This does not remove the downloaded file from your phone, but it will remove the downloads list from Safari. To do that, navigate to the Downloads folder inside the on my iPhone or iCloud folder.
If you are unsure if a file is downloaded, there is an easy way to confirm. If you don't see the remove download option, the file is not downloaded to your device. This helps differentiate between files stored locally and those accessible via the cloud.
Managing your downloads becomes even more critical if you share your iPhone or iPad with someone. Properly managing your downloads is a great way to keep personal files you've downloaded online safe and or deleted from prying eyes. Understanding these file storage locations will make it simpler to get rid of downloads on your iPhone. Remember, the Files app creates a separate downloads folder for each file. If you downloaded a file onto your iPhone or iPad from Safari, you can find it later in the Downloads folder of the Files app.
In case, you have downloaded photos from Safari, they will be found under the Files app. So, if you can't use Safari to see your downloads, just open the Files app, tap browse, go to iCloud Drive, and select the Downloads folder. The Files app is the default location for a range of media types, such as documents, PDFs, and zip files, you download on your iPhone.
Beyond these fundamental steps, a few additional tips can further enhance your experience.
Tip 1: Create Specific Folders for Different Types of Files: Maintaining an organized system is key. Instead of letting all your downloads pile up in one place, create separate folders for documents, photos, and other media. This will significantly reduce the clutter and make finding specific files much easier.
Tip 2: Periodically Delete Unnecessary Files: Regularly reviewing your Downloads folder and deleting files you no longer need is essential. This frees up valuable storage space and keeps your digital environment tidy.
Tip 3: Use iCloud Drive for Cross-Device Accessibility: If you use iCloud Drive, ensure it is synced so your downloads are accessible across all your Apple devices. This feature provides seamless access to your files on your iPhone, iPad, and Mac.
Tip 4: Take Advantage of the "Favorites" Feature: As mentioned earlier, creating a shortcut to your Downloads folder by favoriting it in the Files app is a simple yet effective time-saving strategy.
Tip 5: Utilize the Search Function: When you are looking for a specific file or folder, use the search function within the Files app. This is especially useful if you have a large number of downloads.
Tip 6: Understand Default Settings: Become familiar with the default download locations set by different apps and websites. This will help you predict where your files will be saved, saving you time and effort.
In the realm of iOS file management, understanding the Files app is not just a convenience; it is a necessity. By mastering its functions and utilizing the provided tips, you can transform the once-daunting task of locating downloads into a seamless and efficient process. So, the next time you find yourself wondering where your downloaded files are, remember these steps, and you will find them in a matter of seconds.